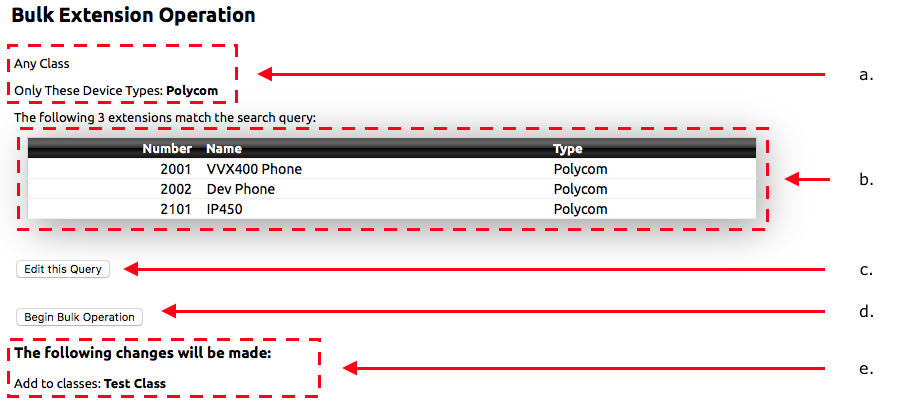
When dealing with large amounts of extensions, NocTel's Bulk Operations tools can significantly reduce the time needed to manage your account. The Bulk Extension Operation is located on the Extensions page of the control panel. When on the Extensions' main page, look for the Bulk Operations link located above the extension table.

This overview is meant to act as a general guide for the steps that need to be taken to setup and perform a bulk operation. Each process will be different depending on what you are hoping to accomplish. After the overview, each of the criteria and actions will be described in detail. The basic steps are as follows
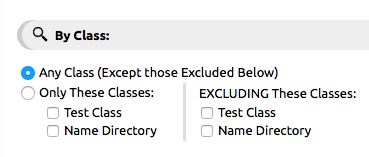
Selecting Criteria: Select your match criteria. This will specifically filter what you want to change. The preview page will return a list of extensions that match all criteria selected. The search criteria sections are divided into categories and located at the top of the bulk operation page and are noted by a magnifying glass symbol. An example of search criteria is shown below. 
You can use the match criteria by itself it is a powerful search tool. |


By Class: Use to filter a "class" of devices. Each extension in an account can be assigned to classes. Classes are useful when you have specific sets of phones that need different permissions and functionality.
Examples: If the account has devices that are spread over several locations/buildings, each location can be assigned to a class so when changes need to be made to those devices they can be easily filtered and changes made with the bulk editor.

By Name: use to filter a set of devices with a particular word in their extension name. If you have labeled all the phones it the sales department with "sales" in the extension names, you could make changes to them by using the name criteria.

By Device Type: Use to filter a set of devices based on the extension type. You can use this area to limit the criteria to a certain type of extension device or to include all types.

By Extension Number: Use to filter a set of extensions based on their numbers. Example: your account may have phones at different sites; Site A may have extension numbers 200-299 while site B may have extension numbered 300-399.

By Cloud Server: Use to select a set of extensions based on its server within the NocTel system. Each physical extension is assigned a primary and secondary server. For both primary and secondary servers, the drop-down box will allow you to select Any, which selects extension on any server or chose from the list of current servers used by your account for selection. Selecting a server will select only extensions that match that server.

General Operations: Use to reload device configuration or reboot device.

Change Class Membership: Allows for the selected extensions to be added or remove from a class. The classes in the account are listed with three options; No Change, Remove From, and Add To. There is also a text box under Add To where a new class can be created.

Change Cloud Server Assignment: Use to change the filter extensions’ primary and secondary server.

Reset User Permission Flags: Use this to change the selected extensions’ User Permission to match with the extension selected from the drop-down box.

User Permission can be edited under: Control Panel > Extensions > Your Extension > Edit Permissions > User Permissions. |
Reset Dialing Permission Flags: Use this to change the selected extensions’ Dialing Permissions to match with the extension selected from the drop-down box.

Dialing Permissions can be edited under: Control Panel > Extensions > Your Extension > Edit Permissions > Dialing Permissions. |
Allow 911 Emergency Calling: Used to change an extension 911 emergency calling permission. Note that all phones physically located in the United States are required to have 911 calling enabled.

Reset Inbound Behavior: Uses an extension selected from the drop-down box as the template for changing the inbound behavior for the other extensions to match.

Set Voicemail Options: Use to remove Voicemail pin and/or enable/disable Voicemail.

Reset Device Preferences: Uses an extension selected from the drop-down box as the template for changing the device preferences for the other extension to match.

Reset Speed Dial Directory: Uses an extension selected from the drop-down box as the template for changing the extensions speed dial presets to match. An individual extension’s speed dials can be set by going to an extensions page and clicking the Speed Dial Directory link below the extensions number and name.

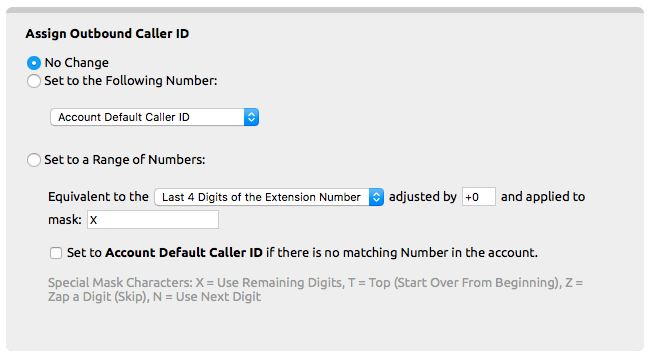
Assign Outbound Caller ID: Use to set the extensions outbound caller ID, can choose from a list of numbers linked to the account.
Using the Set to a Range of Numbers options allows for the outbound caller ID to be set to a matching DID. For example, if you have extensions in a 1001-1099 range with DID in the xxx.xxx.1001 to xxx.xxx.1099 range. This function can be used to match the DID with the extension for its caller ID.

Assign Internal Caller ID: Use to set the extensions internal caller ID to a specific number. This affects calls within the NocTel phone system (like extension to extension calls). This is often useful for IT Helpdesks that wish to mask individual agent extensions and make it seem like they are coming from a lead phone number.

Assign Emergency Services Response Location: Use to set the extension 911 address, can choose from a list of addresses already linked to the account.

Related articles appear here based on the labels you select. Click to edit the macro and add or change labels.
|