Step-by-step guide
- Once you login to your Noctel account, select 'Extensions' to the left.
- Select the extension which you wish to add Voicemail.
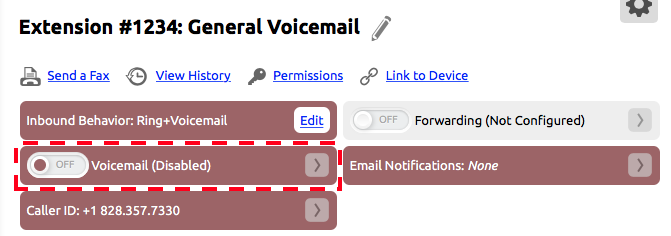
- To the right of the screen there will be a red box that shows 'Voicemail (Disabled)', click on the toggle button that says 'Off'.
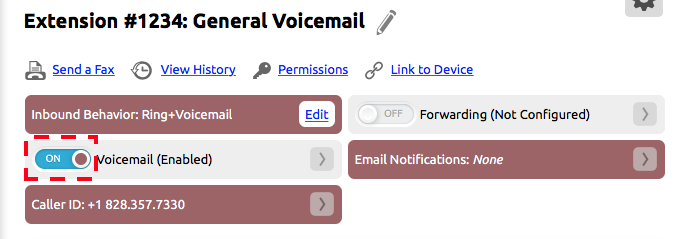
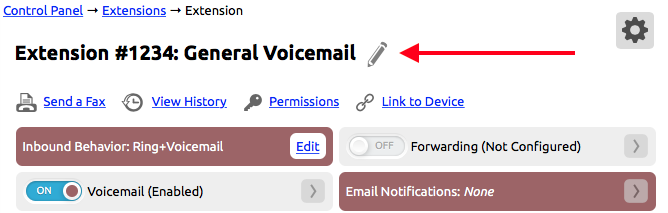
- Now the box should indicate that voicemail is enabled. To assign a pre-recorded greeting or assign a voicemail security Pin, double click on the voicemail box.
...
Enabling Voicemail for an Extension
When a new extension is added to an account voicemail must be enabled for the extension if it is attended to receive voicemail.
- Log in to a NocTel account.
- Click Extensions in the left-hand menu.
- Locate the extensions in the list or search for it using the search bar. Click the extension to open its options page.
- Locate the Voicemail widget.
- Click the Off Toggle to turn voicemail ON for the extension (Enabled).
Initial set up for a physical extension
If the voicemail has been enabled on the extension, you can use the phone to complete the setup:
- Press the voicemail button on the phone or dial *38.
- The system will guide the user in creating a greeting.
- Once the greeting is complete, the system will guide the user is selecting a PIN. (The PIN must be four digits and should not start with 0.)
- Once completed, end the call to end setup.
Initial set up for a virtual extension
If the account is using a virtual extension for a general voicemail use the following steps once voicemail for the extension has been enabled:
- If the virtual extension voicemail has not been enabled, do this now, see “Enabling Voicemail for an Extension” above.
- If the virtual extension has not been assigned an extension number, do so by clicking the pencil icon next to the extension name in the extension’s options page. Enter a number in the area provided and click Save. The extension must have a number to be accessed through the NocTel General Voicemail Menu.
- Click the arrow (>) in the voicemail widget to expand it.

- Assign the voicemail PIN is the box provided. After entering the PIN click outside the opened widget to close it and save the changes. The virtual mailbox must have a PIN to be accessed through the NocTel General Voicemail Menu.
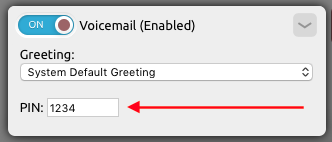
The PIN should be at least four digits and not start with 0.
If a greeting has been pre-made and uploaded, add it now using the Greeting drop down list. To learn how to make and upload a greeting visit the Add a Recording page. If not use the following steps to create the greeting: - On any phone dial *98.
- When prompted enter the extension’s number followed by the # key.
- When prompted enter the extension’s PIN followed by the # key.
- Press 7 for voicemail options.
- Press 1 for greeting set up. Follow the system prompts to record and set the voicemail greeting. Hang up when finished.
Email Notifications
To receive email notifications of voicemail received for extensions:
- In the extension's options page click > to expand the Email Notification widget.
- Add a valid email to the email field.
- To have a copy of the recording attached to the email check the first box.
- Click outside the widget to save the changes.

| Info | ||
|---|---|---|
| ||
Voicemails have a 90-day retention period. If you need to keep a voicemail longer than 90 days, it is recommended that you download and save via a local storage method. |
Other Useful Information
Related articles
| Content by Label | ||||||||||||||||||||
|---|---|---|---|---|---|---|---|---|---|---|---|---|---|---|---|---|---|---|---|---|
|
| Page properties | |||
|---|---|---|---|
| |||
| |